How to Make Maps with ArcGIS Pro & Adobe Illustrator in 3 Steps (hint: AIX)
ArcGIS Maps for Adobe Creative Cloud 2.2 is here! This post will show you how to take advantage of ArcGIS Pro’s new AIX file format for an efficient and user-friendly Adobe Illustrator map-designing experience. In addition to the AIX advantages, at the end of this post you will also learn how to use the new geospatially enabled AIX – available today with the new 2.2 release. Read “A Brief History…” below for more information on this new feature.
There are three Maps for Adobe account levels: complimentary (free), Plus, and the ArcGIS account holder. One of the many great things about this Pro-to-AIX workflow is that – if you are an ArcGIS Creator or GIS Professional user, you already have access to these features. For all of you mappers who want to explore this new feature, download the Maps for Adobe plug-in here.
A Brief History of Maps for Adobe
2015. In 2015, a few of us at Esri were conceptualizing a mapping plug-in for Illustrator. At this point in Maps for Adobe history, we had a nifty prototype that could pull data from ArcGIS Online into an Illustrator file.
May 2017. Version 1.0 is released! Since this release, Maps for Adobe users can build entire maps with Maps for Adobe inside Adobe Illustrator. Maps for Adobe continued to grow with subsequent updates, all the way to version 1.5.2, released March 3rd, 2020.
May 2020. Maps for Adobe 2.0 is released. Ok, this one is big. Its significance exists in details that are important to many mapmakers who, like me, enjoy using Adobe Illustrator for some of their maps’ aesthetic design. ArcGIS Pro users (v. 2.5 and later) can export an Adobe Illustrator Exchange (AIX) file, which can be opened with Maps for Adobe 2.0. Any ArcGIS Pro user with a Creator or GIS Professional license has access to both of these great mapping tools.
October 2020. Maps for Adobe introduces the geospatially enabled AIX file in version 2.2. This release combines Maps for Adobe version’s 1.x ability to create maps inside Illustrator with version 2.0’s ability to open an AIX file. What does this mean? Well, with this latest release, you will be able to open an AIX file in Illustrator and keep adding more data to that Illustrator file with Maps for Adobe. Super convenient!
What is an AIX file?
Prior to May 2020, ArcGIS Pro users typically exported a PDF if they wanted to open their map in Illustrator. A PDF export results in a set of editable vectors, however it does not maintain a map’s layer organization. For those mappers I keep mentioning – the ones who consider Illustrator an important part of their workflow – layer organization is essential to expedient design. ArcGIS Pro 2.5 and later gives the option to export an AIX, or Adobe Illustrator Exchange file. Maps for Adobe users can open the AIX file in Illustrator, which will be “unpackaged” as an impeccably organized AI file. The figures below illustrate a Pro project of a map that I will be referencing throughout this post’s demonstration.
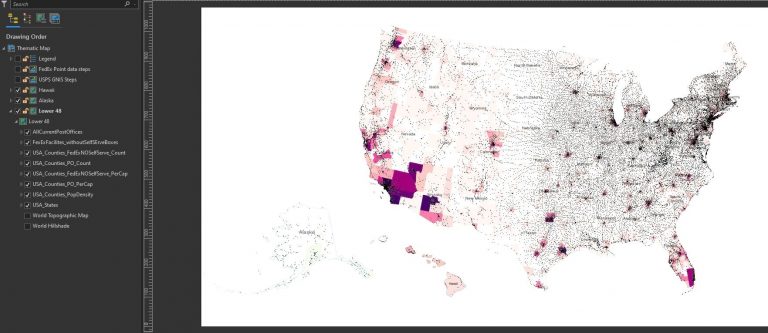

More than 50,000 individual map features
- I have a map layout set up for a typical thematic map of the US: a separate map frame for Alaska, Hawaii, and the mainland 48 states.
- Each map frame in this layout has the following layers:
- USA post offices (more than 32,000 points)
- FedEx Facilities (~9,500 points – *the self-serve FedEx boxes were removed from this dataset)
- Five separate USA counties layers, each symbolized by a different theme:
- Population Density
- Post offices per capita
- FedEx facilities* per capita
- Total post offices
- Total FedEx facilities*
- A USA States layer
32,000+ Post Office points, ~9,500 FedEx points, and (5×3,141)=15,705 counties is more than 50,000 individual features.
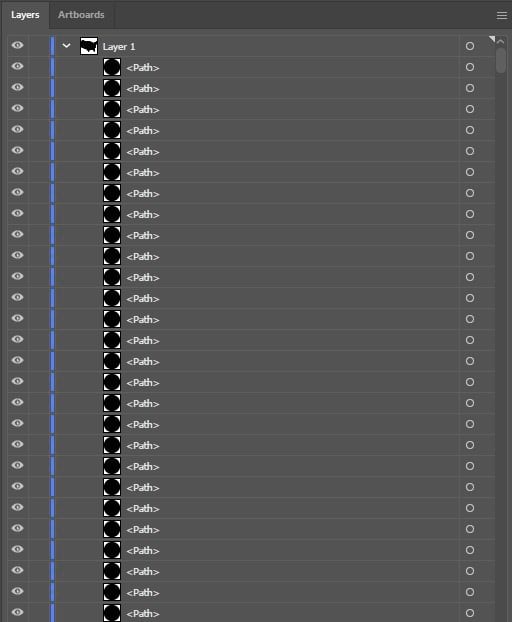
By exporting this layout as a PDF, I would get one single layer in Illustrator with over 50,000 pieces of “artwork” without any identifying layer structure. Imagine trying to scroll through 50,000 paths (image below) just to find the counties of a specific data range for Post Offices Per Capita. The image shows the first few paths of the more-than-50,000 in a PDF export opened in Adobe Illustrator. It would take a full day to organize this export prior to styling it with efficiency. This is why you should use the AIX export option.
Authoring a map for AIX export
There are a few things to consider when setting up an ArcGIS Pro map before sharing it as an AIX. As this feature continues grow, these considerations will change, so keep checking the product’s doc page for updates. In fact, because the AIX option is so new, the product engineers want YOU to help them make it the best for your workflow. They even made this survey for you, so that you can help influence this feature’s evolution.
Step 1 – Setting up the map in ArcGIS Pro to share as an AIX file
The Layers
I decided to create a thematic map series about U.S. Post Offices for this demo. But really, this workflow could work on any map style. In Pro, once you’ve set up your layout with all the analyses and features that you want to include, make sure the layers are visible. See the Maps for Adobe doc for more information on the Pro-to-AIX setup.
Step 2 – Share the layout as an AIX file format
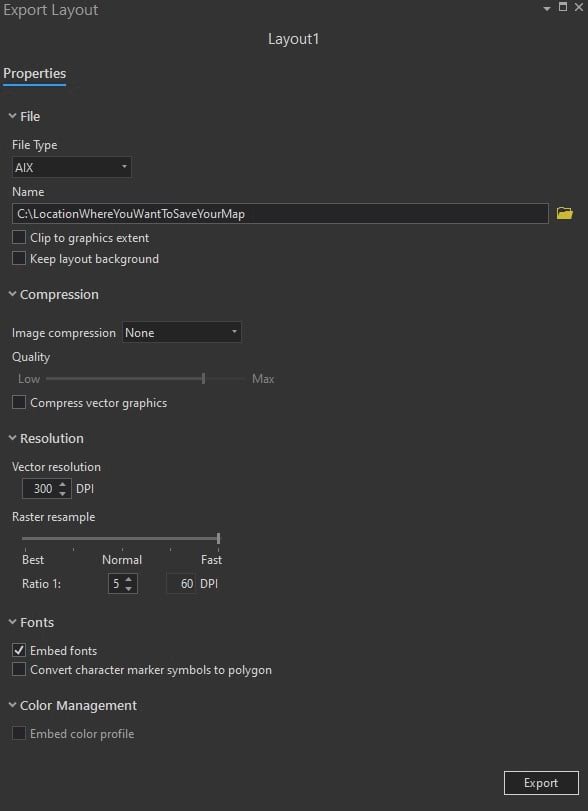
When your map is ready in Pro, click the Share tab and then select “Layout” if you’re sharing the layout as an AIX, which is what I did for this map. (If you were sharing from a map tab, you would select share –> map).Make sure you’re selecting the export option of Layout, and not the print option:

Select AIX as the file format in the dialog. To add new data to the geo-spatially enabled file in Illustrator, be sure to uncheck “clip to graphics extent” to retain the coordination:
Step 3 – Sign in to Maps for Adobe to open your AIX file
With Maps for Adobe 2.2 installed, open Adobe Illustrator, and sign in to Maps for Adobe using your ArcGIS organizational or Creator account. To open an extension in Adobe Illustrator, just go to the Windows menu, where you will then select “Extensions –> ArcGIS Maps for Adobe Creative Cloud. Once you are signed into Maps for Adobe, you can open your AIX file as an organized structured ready-to-design Illustrator file.

The AIX layer structure in Illustrator
Parent Layers
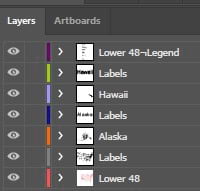
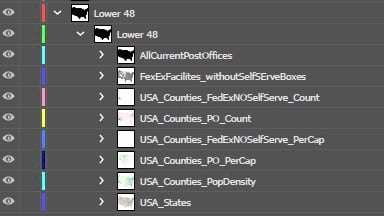
The image above shows the Illustrator file’s layer structure from the Pro project:
- A parent layer for the legend, containing all the artwork making up the legend.
- Parent layers for each map frame’s labels.
- Parent layers for each map frame (Hawaii, Alaska, and the Lower 48 mainland states)
Sublayers
By expanding the Lower 48 parent layer, you can see the beautifully organized structure of each thematic map layer that I had in my Pro project.
Classed category layers in Illustrator
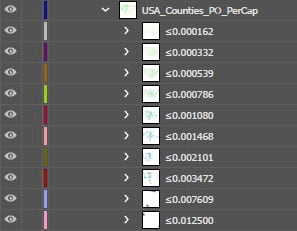
For each layer that was symbolized by a particular class or categorized system, there will be a sublayer for each category. For example, in the image below, there is a sublayer for all the category ranges for Post Offices Per Capita. This means that I can easily select only the counties that I want and give them their own unique style in Illustrator. As you can imagine, this ready-to-go structure saves mapmakers a lot of time.
Geospatial AIX
As you will recall, I told you at the beginning of this post that our 2.2 release has the new geospatially enabled AIX feature. By using my ArcGIS Pro project, let’s take a look at what this means for Maps for Adobe users.
Map frames load as Mapboards
For those of you who have made a map with the traditional Maps for Adobe (making a map directly in Illustrator), you know the three basic steps:
- The Mapboard panel is the space where you create your map’s extent, which is called a mapboard.
- Once you create a mapboard, you can add layers to the mapboard in the Compilation panel.
- After all desired layers, labels, and geoanalyses are added, the mapboard can be downloaded as an AI file from the Compilation panel.
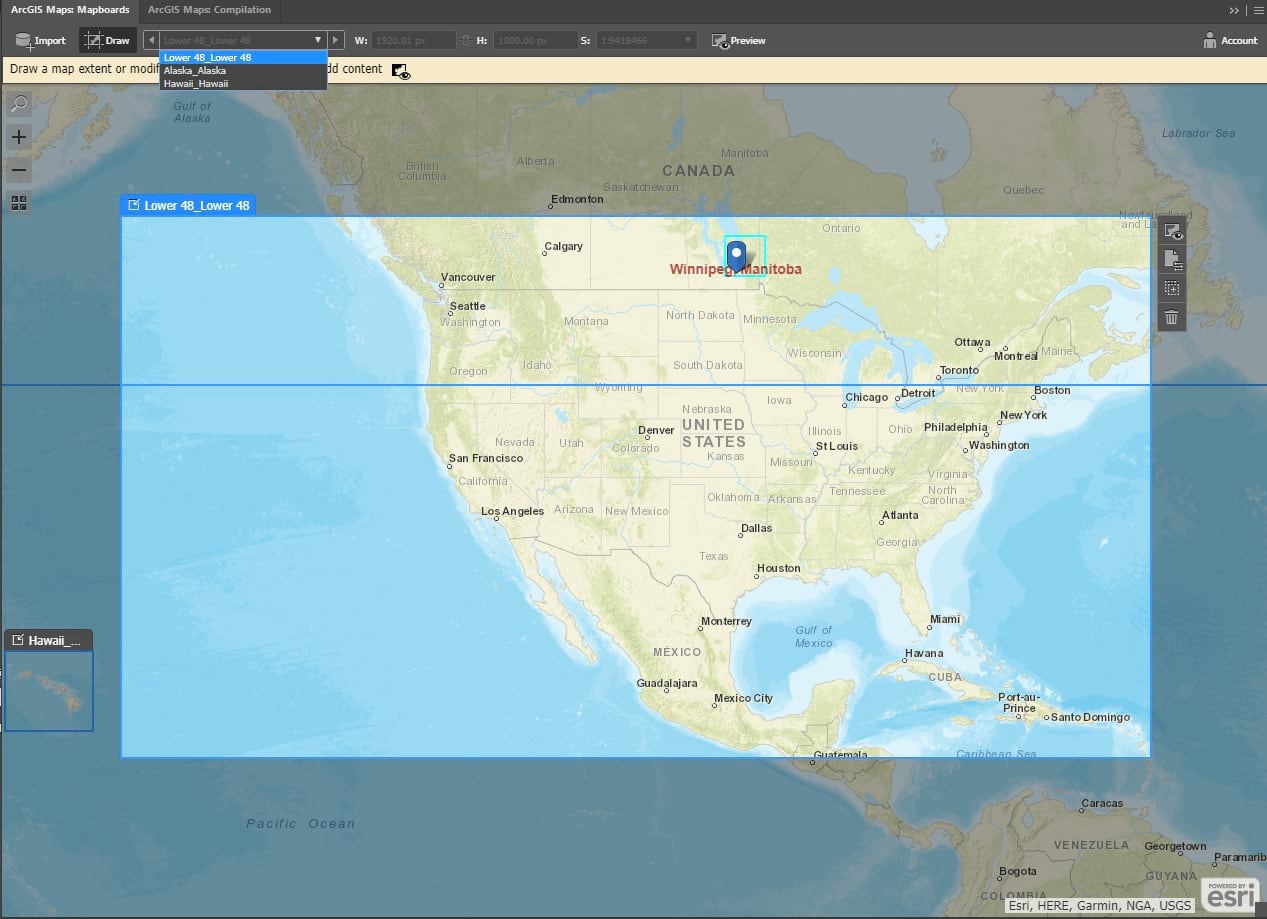
Now, when you open an AIX file in Illustrator, Maps for Adobe will automatically load each map frame from your ArcGIS Pro project as a mapboard in the Mapboards panel. The image below shows the Mapboards panel centered on my Lower 48 mapboard, and the dropdown illustrates each of the three mapboards that loaded when opening the AIX file. That is to say, my Lower 48, Hawaii, and Alaska map frames from my ArcGIS Pro project each have a respective mapboard. What does this mean? Well, now with my map opened in Illustrator, I can add even more layers!
Add new layers to your AIX-generated AI file
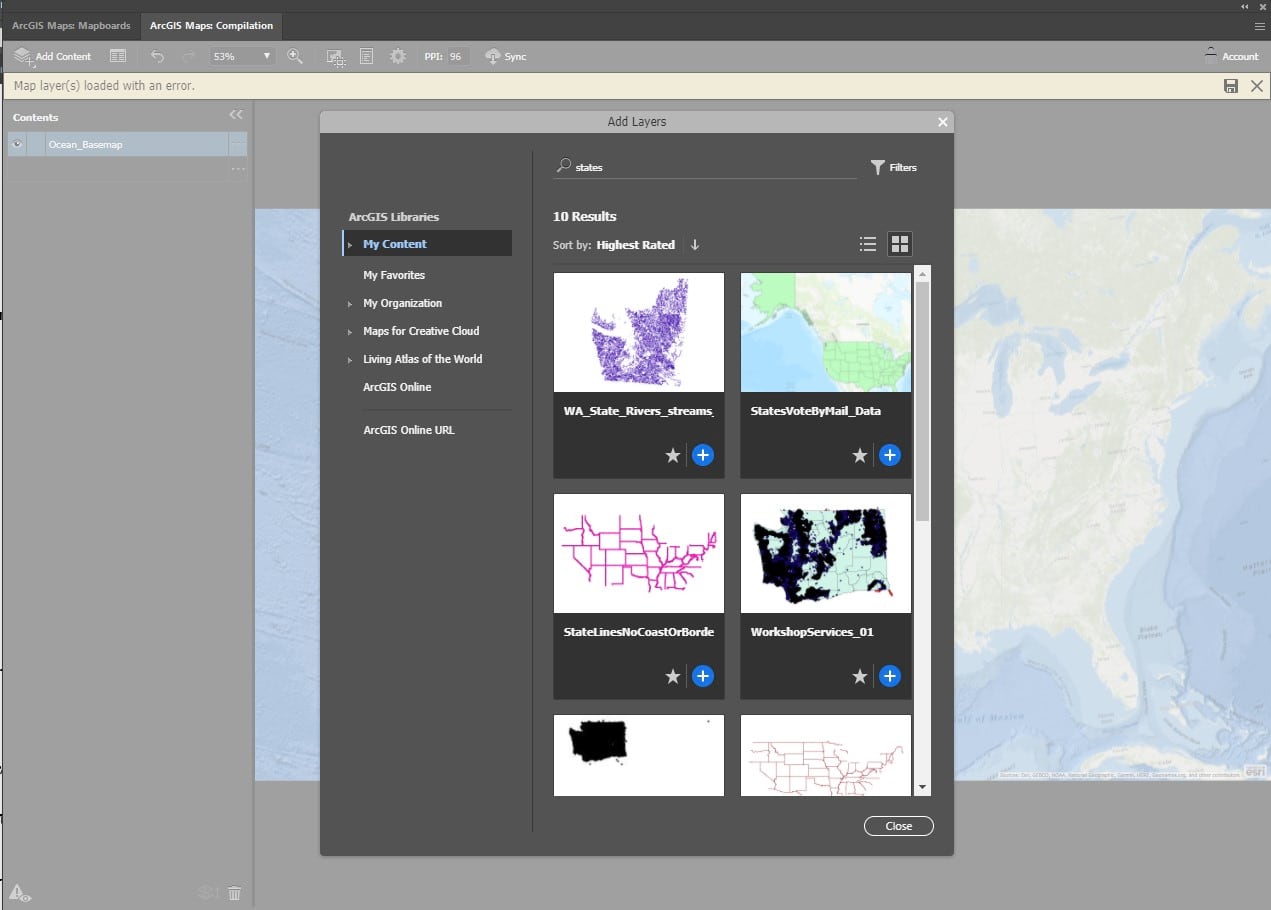
When you open the AIX file, an AI file is created that is automatically synced to Maps for Adobe, as described above. With this link, you can search ArcGIS Online, including Living Atlas and your own personal organization, for additional web maps and layers to add to your AI file. You can also sync local data to the AI file. In the image below, I am adding state boundaries from my ArcGIS organization to my Lower 48 mapboard. After adding the states layer to the mapboard, I click the sync button to add the layer to my Illustrator file. You can view some of the final Post Office maps that I made with this workflow at the end of this post.
If you want to help the product engineers grow this new AIX capability, be sure to check out their survey they made with mapmakers like you in mind.
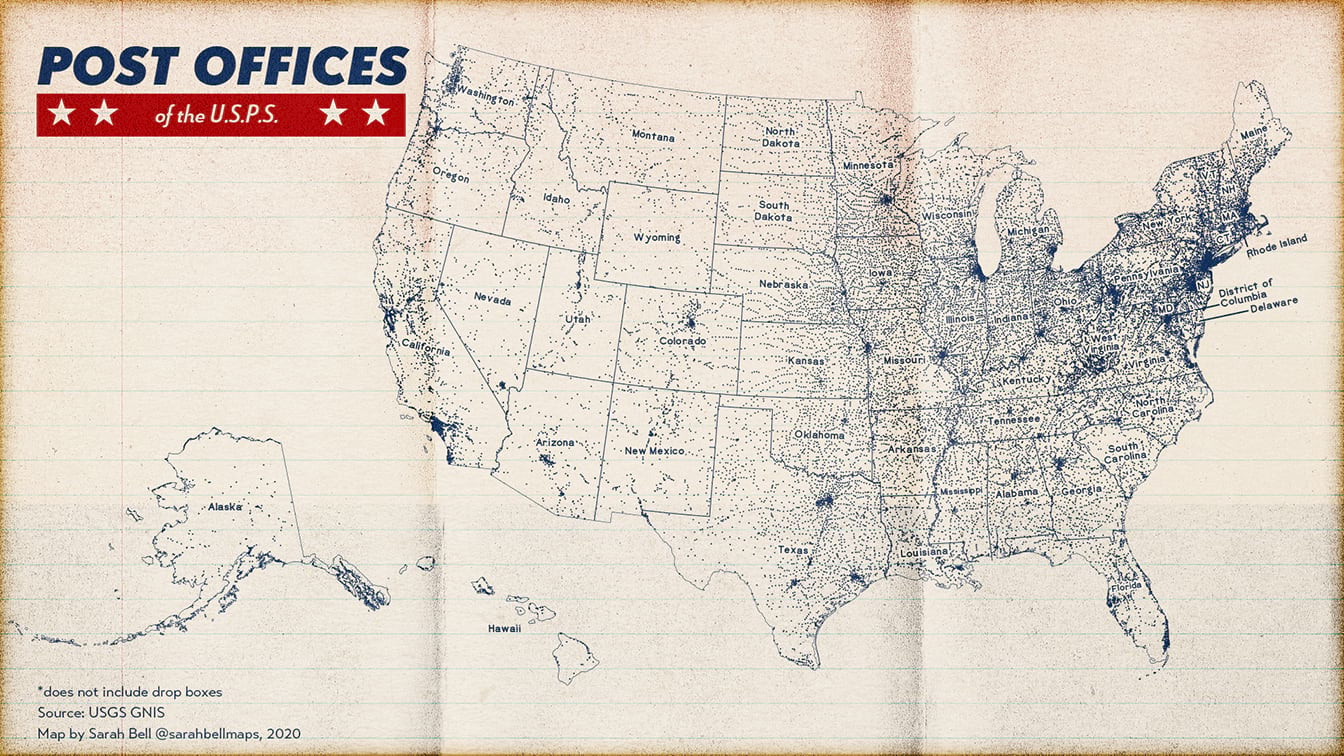
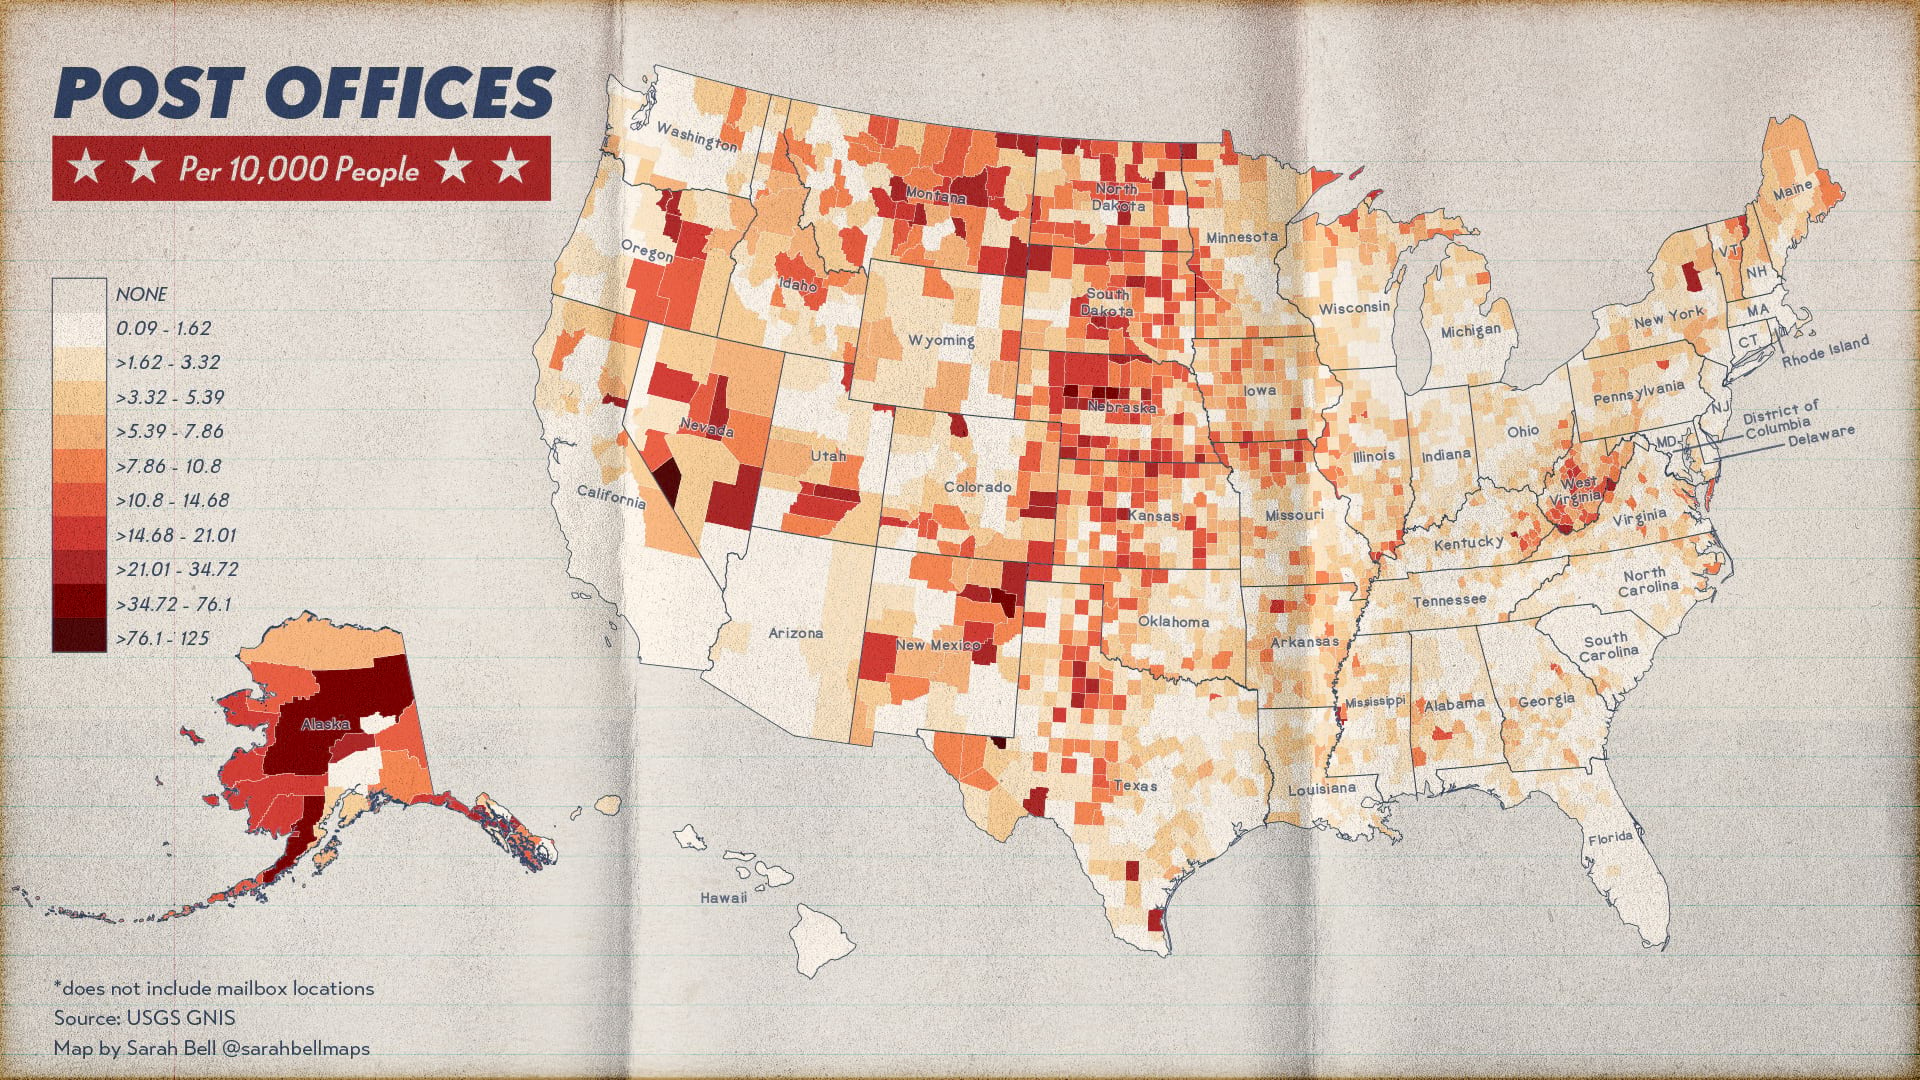
Additionally, at this month’s North American Cartographic Information Society (NACIS) annual conference, I presented the ArcGIS Maps for Adobe Creative Cloud 2.2 release (Maps for Adobe). NACIS is a 40-year-strong community of map enthusiasts who meet once a year to share and learn about cartography projects.
ARTICLE DISCUSSION:



Leave a Reply
I have map with Human Geography Dark, rotated at 29 degrees, and does not open correctly in Illustrator